

onAER FAQ's
B. Account Setup (Registration, Edit Sites/Add Units, User Permissions)
C. Submit Service/Maintenance Forms
E. Installation and Hardware Setup
A. Network Setup
- Network Setup:
Attach your boiler or water heater to a network with access to the Internet. Follow your IT Department's policies and procedures. The network must meet the minimum requirements documented below.
- Enable Data Transmissions:
Enable data transmissions by setting the onAER Upload Timer in the C-More setup menu. 30 seconds is the recommended setting.
i. Data will be transmitted to onAER every to the onAER Upload Timer setting when the unit is firing.
ii. When in "Stand-by" Mode or Disabled the unit will send data to onAER every hour.
- Login and Verify:
Login at onaer.aerco.com and verify your unit is sending data. Your unit will start sending data immediately.
1. Who can Monitor Equipment Through onAER?
i. Equipment Owner
ii. Site Personnel
iii. Owner-selected AERCO Trained Technician
iv. AERCO employees (Internal Technicians and Sales Representatives)
The Owner registers the equipment and can monitor it via onAER after assigning it to a Plant (further instructions below). Site Personnel or AERCO Trained Technician are given permission by the Owner in order to monitor the equipment via onAER. AERCO employees (i.e., internal technicians and your local AERCO Sales Representative) will have access once the unit is registered.
2. Owner Registration (You Must Have onAER-enabled Equipment in Order to Register for the First Time):
1. Go to https://onaer.aerco.com.
2. In the Create an Account box, Click Register.
3. On the next screen, in the BUILDING OWNERS box, click Register my company.

4. On the next screen, enter the equipment SERIAL NUMBER and ACTIVATION CODE:
i. Serial number can be found in the Setup menu of the C-more control box
ii. Activation code is the Fixed ID and can be found in the Configuration menu of the C-More
5. Fill out the fields in the rest of the registration steps, then click REGISTER after completing Step 3.
6. You will receive an email confirmation; in the email message, click CONFIRM EMAIL HERE.
7. You will be taken to the onAER log in page. Log in with your user name and password.
8. Read the onAER Terms and Conditions.
9. In the menu on the left, click MANAGE SITES. The serial number of the equipment you registered will appear in the UNASSIGNED UNITS box in the lower left.
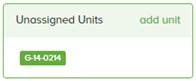
10. At this point, additional onAER-enabled equipment can be entered by clicking ADD UNIT in the UNASSIGNED UNITS box; enter the equipment SERIAL NUMBER and ACTIVATION CODE, then click SAVE.
3. How to Assign Equipment to Monitor Performance:
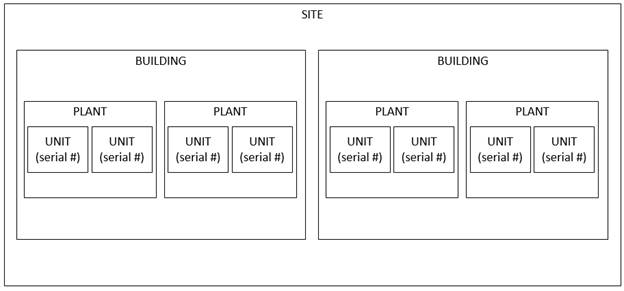
In order to monitor equipment, you need to create a SITE, BUILDING and PLANT and then assign equipment to the PLANT. onAER uses the following organizational structure:
i. SITE consists of BUILDINGs
ii. BUILDING consists of PLANTs
iii. PLANT consists of UNITs
This can be visualized in the diagram below:
1. Click MANAGE SITES in the menu.
2. Click ADD SITE.
3. Fill out all fields in ADD NEW SITE. Click SAVE.
4. Fill out all fields in ADD NEW BUILDING. (Optional: upload a photo of your building). Click SAVE.
5. Enter NAME OF PLANT. Click SAVE.
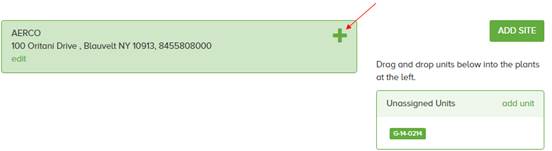
6. At this point, a unit can be added to this Plant in one of two ways.
i. After a Plant Name is created and saved, a unit previously not entered can be assigned by entering the equipment's SERIAL NUMBER and ACTIVATION CODE, then click SAVE.
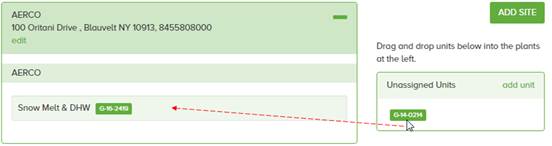
ii. Click MANAGE SITES in the menu.
a) Expand the Site detail by clicking the "+" sign on the right.
b) Click, hold, and drag a unit's serial number from the UNASSIGNED UNITS box to a Plant
7. Units that have been assigned to Plants can now be monitored via the OVERVIEW, SITES or UNITS pages, or by using the SEARCH SERIAL NUMBER on the upper right corner.
4. How to Add Buildings, Plants or Units to a Site:
1. Click MANAGE SITES in the menu.
2. Click EDIT on the site for which you want to add buildings, plants, or units.

3. Add
a building by clicking ![]() ,
enter building information and click SAVE.
,
enter building information and click SAVE.
4. Add
a plant to a building by clicking ![]() ,
enter plant information and click SAVE.
,
enter plant information and click SAVE.
5. Add
a unit (previously not entered) to a plant by clicking ![]() , enter
the equipment SERIAL NUMBER and ACTIVATION CODE, then click SAVE.
, enter
the equipment SERIAL NUMBER and ACTIVATION CODE, then click SAVE.
5. User Permissions (How an Owner Gives Permission to an AERCO Technician or AERCO Sales Representative to Monitor Equipment at a Jobsite):
1. Click MANAGE ACCESS.
2. Scroll to the bottom of the page to ADD NEW CONTACT.
3. Fill out email, select user type, and select jobsite. User Types:
i. Read Only User - monitoring access only; view forms in unit details (startup/maintenance/service forms)
ii. Write User - monitoring access; change settings/fill out forms unit details (fault alert settings, startup/maintenance/service forms)
iii. Administrator - everything available to Write User plus manage sites and manage access
4. Click ADD CONTACT.
5. The contact you added will receive an email confirmation with a link back to onAER.
6. How an Administrator Changes User Type of Existing Contacts:
1. Click MANAGE ACCESS.
2. Scroll to the Site in which you want change a Contact's User type.
3. Under USER TYPE, select user type.
7. How to Register after Receiving an onAER Invitation from an Administrator:
1. On the Invitation/Access Granted email, click on CLICK HERE.
2. You will be taken to onAER REGISTER webpage. Fill out all the fields and click REGISTER.
3. You will be taken to the onAER log in page. Log in with your user name and password.
4. Read the onAER Terms and Conditions. You must accept the terms in order to enter the site.
1. How to Fill out a Start-Up Form:
1. View a unit by going to SITES or UNITS in the menu, or by using the SEARCH SERIAL NUMBER on the upper right corner.
2. Click ADD NEW START-UP FORM.
3. Fill out all the fields.
4. Use ADDITIONAL NOTES field to add more details.
5. All fields in the calibration section must be filled out.
6. Click SAVE or SAVE AS DRAFT (no validation):
i. SAVE - Saves the Start-up form.
ii. SAVE AS DRAFT (no validation) - will save a draft of the Start-up form. Screen refreshes to unit details. To finish the form, click EDIT START-UP FORM (form is not complete), complete all the fields and click SAVE.
2. How to Edit a Start-Up Form:
1. View a unit by going to SITES or UNITS in the menu, or by using the SEARCH SERIAL NUMBER on the upper right corner.
2. Click EDIT START-UP FORM.
3. Complete all the fields.
4. Click SAVE AS NEW REVISION. New revision becomes the active Start-up Form; previous revisions are discarded.
3. How to Create a Maintenance Log:
1. View a unit by going to SITES or UNITS in the menu, or by using the SEARCH SERIAL NUMBER on the upper right corner.
2. Click MAINTENANCE/SERVICE PERFORMED.
3. Click on MAINTENANCE button.
4. All "Inspect and Test" items in the MAINTENANCE CHECKLIST must be performed and checked off.
5. Use NOTES to add more details.
6. All fields in the calibration section must be filled out.
7. Optional:
track parts replaced by clicking ![]()
8. Fill out the TECHNICIAN name and select CERTIFICATION LEVEL.
9. Click SAVE.
4. How to Create a Service Log:
1. View a unit by going to SITES or UNITS in the menu, or by using the SEARCH SERIAL NUMBER on the upper right corner.
2. Click MAINTENANCE/SERVICE PERFORMED.
3. Click on SERVICE button.
4. Fill out all the fields.
5. Optional: track parts replaced by clicking ADD NEW PART
6. Fill out the TECHNICIAN name and select CERTIFICATION LEVEL.
7. Click SAVE.
5. How to View/Edit Maintenance and Service Logs:
1. View a unit by going to clicking SITES or UNITS in the menu, or by using the SEARCH SERIAL NUMBER on the upper right corner.
2. Click MAINTENANCE/SERVICE PERFORMED.
3. Click
![]()
4. On the next screen, click EDIT or VIEW a log. You can only edit a log that you created.
5. If editing a log, click SAVE when finished.
6. How to Change Next Maintenance Date Sooner than 12 months from Last Maintenance:
1. View a unit by going to clicking SITES or UNITS in the menu, or by using the SEARCH SERIAL NUMBER on the upper right corner.
2. Click MAINTENANCE/SERVICE PERFORMED.
3. Click MAINTENANCE/SERVICE HISTORY LOG.
4. On the next screen, enter a date next to SCHEDULE.
5. Click SCHEDULE.
1. How to Manage Delivery Frequency of Alerts and Reports by Site:
1. Click on your name at the top right corner.
2. Click PROFILE.
3. In ALERTS AND MONTHLY REPORTS, check off your preferred alerts:
i. Alerts - unchecking this box stops an email from being sent when faults occur. This is applied to all units for selected Site.
ii. Weekly Reports - unchecking this box stops the weekly report of unit performance data. This is applied to all units for selected Site.
iii. Monthly Reports - unchecking this box stops the weekly report of unit performance data. This is applied to all units for selected Site.
4. Click SAVE.
2. How to Manage Delivery of Alerts on Disabled Units:
If a unit is disabled, onAER sends a daily alert advising a unit has been disabled. If unit is disabled on purpose for extended shutdown period (e.g., summer shutdown), the daily alerts can be stopped as follows.
1. View a unit by going to SITES or UNITS in the menu, or by using the SEARCH SERIAL NUMBER on the upper right corner.
2. Click EXTENDED SHUTDOWN PERIOD.
3. In Duration, enter the amount and unit of time.
4. Click YES. (clicking NO takes you back to the Unit details page and onAER will continue to send daily alert advising the unit has been disabled).
5. Unit details page: EXTENDED SHUTDOWN PERIOD will show "Enabled until MM/DD/YYYY"
Note: when unit is in Standby or Disabled, onAER continues to receive data every hour. This would be reflected in the weekly and monthly reports.
3. How to Manage Delivery of Alerts on Units in Maintenance or Service:
When a unit is in maintenance or service, it may be useful to disable fault alert until the work on the unit is done. The alerts can be stopped for the next 24 hours as follows.
1. View a unit by going to SITES or UNITS in the menu, or by using the SEARCH SERIAL NUMBER on the upper right corner.
2. Click DISABLE FAULTS FOR 24 HOURS.
3. Click YES. (clicking NO takes you back to the Unit details page and onAER will continue to send fault alerts).
4. Unit details page: FAULTS ENABLED/DISABLED will show "Disabled for xx hours xx minutes"
Note: when unit is in Standby or Disabled, onAER continues to receive data every hour. This would be reflected in the weekly and monthly reports.
4. How to Add a Unit to the FAVORITES Panel of the OVERVIEW Screen:
1. View a unit by going to SITES or UNITS in the menu, or by using the SEARCH SERIAL NUMBER on the upper right corner.
2. On
the unit detail screen, click ![]()
3. On
the TECHNICAL DATA screen, click ![]()
5. How to Remove a Unit from the FAVORITES Panel of the OVERVIEW Screen:
1. View a unit by going to SITES or UNITS in the menu, or by using the SEARCH SERIAL NUMBER on the upper right corner.
2. On
the unit detail screen, click ![]()
3. On
the TECHNICAL DATA screen, click 
Installation and Hardware Setup
- How Would You Summarize the onAER Setup and Configuration?
Each AERCO boiler and water heater comes with an Ethernet port. Using a CAT5 Ethernet cable, and following your IT department's security policies and procedures, connect to a LAN or secured VLAN that supports DNS and DHCP, with no passwords, and outbound HTTP port 80 open. The equipment will contact onAER automatically once configured. Never setup equipment with external internet accessible addresses. Always follow your IT department's security policies and procedures. You are responsible for the security of your network.
- How Should We Configure our LAN for onAER to Work Properly?
What Are the Network Requirements?
The LAN must support DHCP and DNS so the Ethernet cards can get an network address and find the onAER site. The LAN must have port 80 HTTP open and not prompt for a password. AERCO recommends using non-static addresses.
- What if I Don't Have DHCP and/or Require Static Addresses?
AERCO Ethernet cards ship set to DHCP by default. If you need to reconfigure the cards with fixed addresses, you will need to download and install the AERCO Ethernet Configuration tool on a Windows PC and attach to the subnet where the cards are installed. The sofrware can be downloaded from this link (link here). AERCO recommends using non-static addresses.
- What Are the Cable Requirements?
CAT5, CAT5e, or CAT6 will work with onAER. Please consult your cable contractor or electrician for conduit and cable ratings for your location.
- Where Do I Connect the Network?
The connection point (RJ-45) is on the red Ethernet card on the I/O board.
- Where Can I Find the MAC Address?
The MAC address is printed on the white label on the Ethernet card mounted on the I/O board.
- What Port Speeds do the Ethernet Cards Operate at?
The Ethernet cards operate at 10/100Mbs.
- What Ports and Protocols Does onAER Use or Require?
onAER uses HTTP port 80 outbound for communications. No other ports or communication protocols are supported at this time.
- How Do I Access My Equipment From the Internet?
You can't. onAER was designed with security in mind. When properly setup, there is no ability to access a boiler or water heater from the Internet. All onAER communication is outbound and initiated by the boiler. By sending small packets of information about your boiler and at intervals, a complete operational profile can be developed. You can access your boilers information at onaer.aerco.com.
- How Secure Is onAER?
No network connection can ever claim to be 100% secure. onAER has the following security features and additional steps can be taken as noted below.
- onAER communication is outbound only.
- onAER communication is initiated by the boiler or water heater.
- onAER uses port 80 HTTP to send data.
- Your equipment addresses are internal addresses only.
- The boiler controller is unable to receive any data from the internet card.
- Can My Boiler Get Hacked?
The data receive line between the network card and the boiler has been disabled by default on all units. When a boiler or water heater ships, the boiler controller is unable to receive data from the internet card.
- Can My Network Get Hacked by Using onAER?
Using onAER is similar to attaching a printer or PC to your network. AERCO has no knowledge of your network and makes no security claims.
- What Should I Do If I Am Still Concerned About Security?
If you are still concerned with security, onAER can be setup off of your network, for example on a VLAN or on a separate network like a broadband or cellular network.
- Do I Need A Network Drop For Every Boiler?
Yes and no. To get the optimal information for monitoring and troubleshooting a network drop (network connection) is recommended for every boiler. However, BST and WHM users may connect only to the manager unit.
- What Do I Lose if Only the BST or WHM Manager is on the Network?
When only the BST manager is connected, all data is transferred to is via the BST or WHM Modbus communications line. The Modbus communications is a subset of data and does not include setup data and detailed fault data. Individual data items like Serial number are also not transferred. This is why we recommend connecting each unit.
- What Do I Do if there is Only One Network Drop in the Room?
A network switch can be used to provide more connection points if only one network drop is available in the room. Consult with your IT department. Many companies have policies regarding attaching network devices. You should consult with your IT department before attaching any equipment to your network. AERCO provides tested industrial communications equipment that can make this process easier.
- Do You Have a Quick Start for My IT Folks?
Yes - (link onAER Quick Start for IT)
- How Can We Test Network Connectivity?
- To test physical connectivity, the unit's Ethernet card should have a steady green link light and an orange network activity when connected.
- Pressing MENU+ENTER sends a packet to onAER. You can log on to onAER and select the unit to check.
- What Are the Recommend Network Connection Options?
AERCO recommends wired 10/100 Ethernet connections for the best performance and most reliable results.
- Does onAER Support Wireless?
Yes. However, we recommend wired Ethernet connections for performance and reliability reasons. Wireless can mean Wi-Fi or cellular. For Wi-Fi AERCO recommends using a Wi-Fi router, access point, or switch that can operate in "Client Mode". A typical configuration is: units connected to a wired switch and then the wired switch is connected to the Wi-Fi switch in Client Mode. The Wi-Fi switch connects wirelessly to one of your existing wireless networks.
AERCO provides a communications device with this functionality.
NOTE - for Wi-Fi to work reliably, no guest network that require a password, and an access point that is close to the equipment is required. Your results/performance may vary and may be impacted by the location of the nearest WAP, and piping and equipment in the room.
onAER has been tested and operates over cellular networks. AERCO does not provide cellular equipment at this time.
- What Do I Do if There is No Ethernet in the Room?
Broadband, Wi-Fi, and Cellular are options.